Smart Photo Selection guide
How to Edit an Album Sheet in the Editor
Hand-finish a sheet in Smart Photo Selection's Album Editor: place and swap photos in slots, crop, reorder layers, adjust tone, and save or export the sheet.
By Smart Photo Selection TeamUpdated Published 5 min read
Short answer
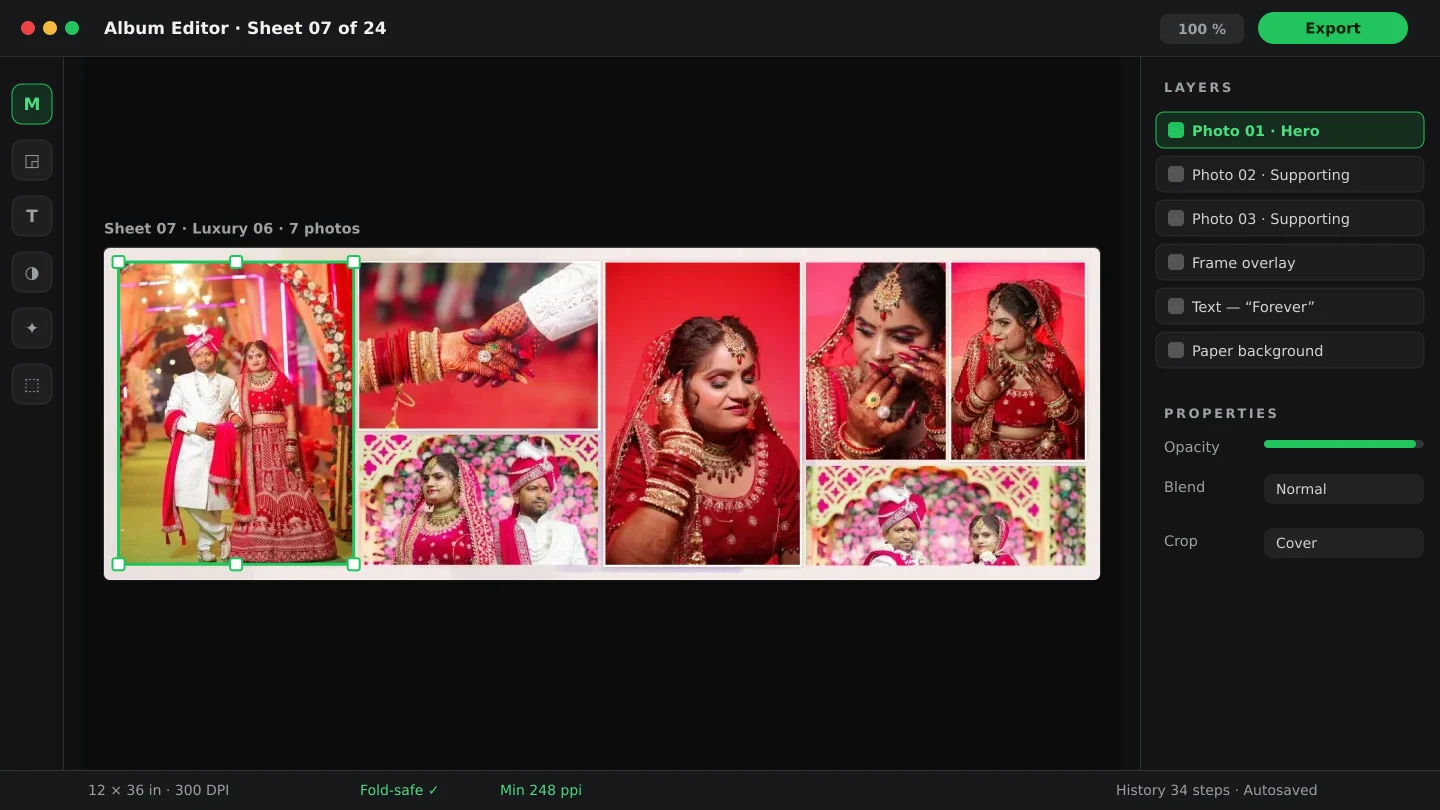
Open the editor from Open in editor in the mapping or preview step. Use Choose photos… (shortcut P) to add frames, then the canvas actions Add Photo, Change Photo, Adjust Crop and Remove Photo on any slot. Reorder with the right-hand Layers panel or Bring Forward / Send Backward, correct tone in Adjust, and undo anything with Undo. File › Save now keeps the work; Save Sheet (render final) writes the finished sheet, and Export JPG / PNG / WebP / TIFF / PDF / PSD… takes it out.
What You Need
- A computer or landscape tablet — the editor needs at least 1024 px of width.
- An album project with at least one sheet (or the willingness to add one).
- Photos in the project —
Choose photos…pulls from the booking gallery or your computer.
Where you land
The editor opens at /album-studio/<album>/editor — from Open in editor beside a sheet, from the mapping step, or from the project card. Two guardrail messages appear before any editing: on a narrow screen, The album editor needs a larger screen — Open this album on a computer or a tablet in landscape (at least 1024 px wide) to edit layers. You can review the sheets and generate the album here. And for an empty project, This album has no sheets yet — Choose photos and a template first. (automatic) or Add a sheet to start. (manual), with a Go back link.
The panels you will actually use
| Tab | What it does |
|---|---|
Photos | The booking gallery, docked — drag a photo onto the canvas or a slot |
Layers | Stack order, visibility, masks; right-click for Change Photo…, Adjust Crop…, Duplicate, Bring Forward, Send Backward |
Properties | Exact position, size, rotation and canvas settings (Canvas size & background… lands here) |
Adjust | Exposure, contrast, colour — per photo layer or globally |
Filters | Stylistic filters applied to the selected layer |
Brush | Paint on masks: on a layer mask, light reveals and dark hides |
History | Every committed step, jumpable — Add photo DSC_5401.jpg, Change photo → …, Duplicate layer |
The Window › menu opens more panels when you need them — Brush Presets, Channels, Paths, Swatches, Gradients, Layer Comps, Actions, Info, Clone Source, Notes.
Step by step: finish a sheet
- 1
Get photos in
Click
Choose photos…(or pressP, or File ›Add photos…). The hint under the canvas reads Click the canvas to place a photo there, or click a slot to fill it. With the Place Photo tool active,Ctrl+Oopens the same picker. - 2
Work the slots
Empty slots show a
+ Add Photobutton. Select a filled slot and the actions above it becomeChange Photo,Adjust CropandRemove Photo(orDelete). Template slots explain themselves: Template slot: its position, size and shape come from the PSD. Drag on the photo (or use Adjust Crop) to reposition it inside the slot. - 3
Crop without breaking the frame
Adjust Croplets you reposition the photo inside its fixed slot. The frame's ratio never changes — only the window onto the photo. - 4
Reorder and restyle
Drag layers in
Layers, or right-click and useBring Forward/Send Backward. Text and shape layers sit alongside photos;Propertiesgives exact numbers. - 5
Correct tone and skin
The
Adjustpanel handles exposure, contrast and colour for the selected layer — the same conservative approach as natural skin retouching: fix what the camera got wrong, not the person. - 6
Check before/after
Hold the
Before/Afterbutton (or\) to see the original, or useView › Before / after splitfor a persistent split.Fit on screenandActual Pixels (100%)(View menu) jump between overview and 1:1. - 7
Save, then render
File › Save nowstores your edits (toast Saved).Save Sheet (render final)— also theSave Sheetbutton with a ✓ when done — renders the sheet as the finished page. Undo is always there:Undoshows the label of what it will reverse. - 8
Export or leave
File › Export JPG / PNG / WebP / TIFF / PDF / PSD…opens the export dialog for this work;File › Close editorreturns to the album. New sheets come fromFile › New sheetorDuplicate sheet.
Tips
- Duplicate the sheet before a risky experiment —
File › Duplicate sheetcosts nothing and keeps the safe version. - Keep the
Photospanel open and drag instead of clicking through dialogs; it is the fastest path onto the canvas. - Use number keys for layer opacity while painting masks (1 = 10% … 0 = 100%), then check with Before/After.
- Jump between sheets from the bottom bar, and save each one with
Save Sheetas you finish it.
Common Mistakes
Dragging a photo out of a template slot
Slot geometry comes from the PSD. Move the photo inside the frame with
Adjust Crop; dragging the slot itself fights the design.Editing without checking the history labels
Every action is named — Change photo → …, Add 6 photos — so a wrong move is one
Undoaway. Use it rather than compensating by hand.Treating Filters like a look
Albums read best with matched tone across a spread. Apply adjustments consistently, or neighbouring sheets will clash when printed side by side.
Closing without `Save now`
Saving is explicit. Run
File › Save now(or let autosave catch up) beforeClose editor, especially before generating.
Frequently Asked Questions
Can I edit a sheet that was generated automatically?
Yes — the mapping output is just the starting doc. Open it in the editor, change anything, then Save Sheet to render it again.
Why is my screen too small message showing?
Below 1024 px the editor swaps to a read-only review of the sheets; editing layers needs a desktop or landscape tablet.
Do editor changes survive a regeneration?
The saved sheet does — generation renders the current sheet docs. Rebuilding the mapping replaces them, so map first and edit after.
How do I add text to a sheet?
Use the Horizontal Type tool from the toolbar, then set Character and Paragraph options in Properties.
Related Guides
- How to Generate Album SheetsRender the album into print files: pick JPG, PNG, Layered PSD, TIFF, PDF or WebP, pass the preflight checks, watch the job run, and download the sheets.
- How to Map Photos to Template SlotsPlace every chosen photo into the right frame: how the mapping step fills slots in album order, swaps and replaces frames, and catches low-resolution photos.
- How to Retouch Skin Naturally in Wedding Photos With Smart Photo SelectionStep-by-step natural skin retouching in Smart Photo Selection: Spot Healing, Healing Brush, Clone Stamp and gentle dodge and burn that keep real skin texture.
- How to Use Layers, Layer Masks and Clipping Masks in Smart Photo SelectionLearn how layers, layer masks, clipping masks and adjustment layers work in the Smart Photo Selection editor, with the exact menu names and shortcuts.
Related Features
Further Reading
- AI Wedding Album Design: The Complete GuideHow AI wedding album design works, what it does well, where you still decide, and a practical workflow from photo selection to print-ready export.
- How AI Chooses Photos and Album LayoutsWhat Smart Photo Selection's AI measures — sharpness, exposure, faces, orientation and duplicates — and how those signals become a hero photo and a balanced spread.
- A Wedding Album Delivery Workflow for PhotographersA practical album workflow for wedding photographers: client photo selection, design, review rounds, revisions, lab checks, printing and final delivery.
Try It in Smart Photo Selection
Open Album Studio with a photographer account, pick a booking and follow the steps above on your own photos.